NOW YOU CAN GET LIVE MAIL MERGE SUPPORT!
For just $29 for a 30 minute session, Paul Montenero can remotely connect to your computer and SOLVE your mail merge problem while you watch! This is the BEST way for you to learn Mail Merge! For more details, visit our support page, or to schedule a session, email paul at paulj@clearcutcomputing.com, or
call him at (516)-845-4081.
|
Mail Merge with Microsoft WORD & EXCEL
For Word/Excel 2002 & 2003
For the most common Mail Merge process, you need to first setup and populate a database in Excel, and then employ the Mail Merge Helper in Word.
Your Excel data should be setup to look something like this:

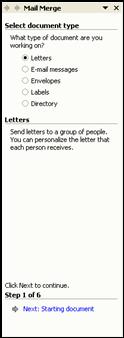
Once youve created and saved your data in Excel, you can open a Microsoft Word document. From the menu, select Tools--->Letters and Mailings Mail--->Merge Wizard. The window, shown at the right, will be displayed.
The wizard will guide you through six steps to complete your Mail Merge. Lets examine these three steps in more detail.
STEP 1 choose a Mail Merge job type
- The first step allows you to select the type of mail Merge document you want. For this example well select Letters. The Mailing Labels example will be discussed briefly later on.
- Click Next: Starting document on the bottom to move to the next step.
|
|
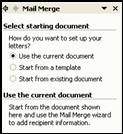
STEP 2 choose a document
- Next to choose a document . Select Use the current document if you want to add mail merge data to the current document displayed in Word; otherwise choose Start from a template, which allows you to choose from any Word templates you have on your computer. Or, if youve typed document and want to convert it to a Mail Merge form letter, choose Start from an existing document.
- Click Next: Select Recipients on the bottom to move to the next step.
|
|
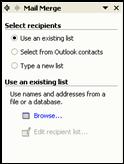
STEP 3 Select recipients
- For this example, we need
to choose Use and existing list, and then click the Browse button.
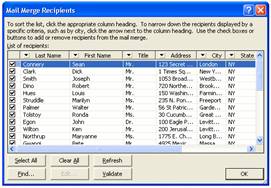
A file open dialog window will appear. Be sure to set the Files of type box at the bottom of the window to Excel files and then navigate to your excel file.
After you choose the worksheet, you will get the window below showing all of the records (your data) in the file. All will be checked off, to exclude any records, simply uncheck them.
|
|
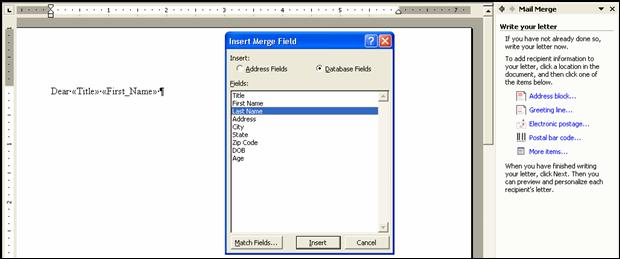
STEP 4 Write your letter
- The first four choices in this step are suppose to help you do a block of field placements. Ive found that the last choice, More items, is easiest and more versatile.
|
|
- Start writing your letter, and where you want to put a field (a placeholder for data that will change from record to record), click the More items button.
- Select the field you want and click Insert. The field is place where your cursor was. Click Cancel to close the window.
- Repeat these last two tasks above until youve completed your letter.
|
|
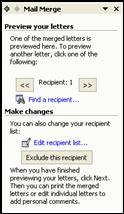
STEP 5 Preview your letters
- You can use this step to move record-by-record through your data and see how it will look.
|
|
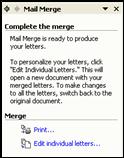
STEP 6 Complete the merge
- Print... finishes the merging and immediately prints your letters to the printer.
- Edit individual letters... finishes the merge and displays the results in a new Word documentone page per record. This is great if you want to perform some custom editing on a few individuals letters. Another beneficial use of this step is that you get to save the resulting merge to a separate file, so you have a record of these specific merged documents.
|
|
|
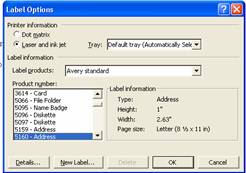
MAILING LABELS
In Step 1, we had the opportunity to choose Labels. Had we done so and clicked next, Step 2 would have contained a button for Label Options, which would bring up the window below. Here you get to pick from a library of standard label sizes or create a new definition.
Once you click the OK button, you then proceed with Step 3 and, more importantly, Step 4which would allow you to once again insert fields onto the label matrix. The matrix is simply a word table configured to the dimensions of the labels you chose. IN THE UPPER LEFT CELL ONLY, you insert merge fields just as you did in step 4 of the letter. When you are done defining this first label, you click the Update all labels button and proceed to step 5 as in the above instructions.
|
|
Copyright © 2004-2007 by Paul J. Montenero, President, Clear-Cut Computing Corp.
(516) 845-4081 paul@clearcutcomputing.com
|