|
|
|
|
|
|
|
|
|
|
|
|
NOW YOU CAN GET LIVE MAIL MERGE SUPPORT!
For just $29 for a 30 minute session, Paul Montenero can remotely connect to your computer and SOLVE your mail merge problem while you watch! This is the BEST way for you to learn Mail Merge! For more details, visit our support page, or to schedule a session, email paul at paulj@clearcutcomputing.com, or
call him at (516)-845-4081.
|
Mail Merge with Microsoft WORD & EXCEL
For the most common Mail Merge process, you need to first setup and populate a database in Excel, and then employ the Mail Merge Helper in Word.
Your Excel data should be setup to look something like this:
|
|
|
|
|
|
|
|
|
|

|
|
|
|
|
|
 |
|
|
|
|
|
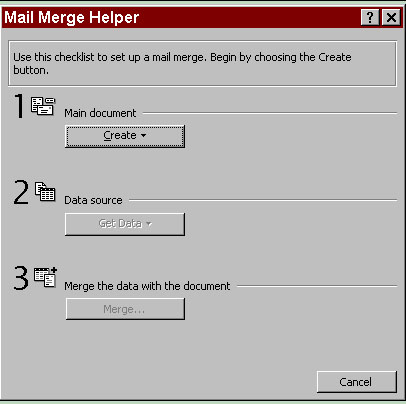
Once you've created and saved your data in Excel, you can open a Microsoft Word document. From the menu, select ToolsÆMail Merge. The Mail Merge Helper window (shown at the right) will be displayed.
Very simply, follow the three steps as outlined on this window and you will be guided through the creation of a complete working Mail Merge.
Let's examine these three steps in more detail.
|
|
|
|
|
|
|
|
|
|
|
|
|
|
|
|
STEP 1 -choose a document
The first step allows you to select the type of mail Merge document you want. For this example we'll select Form Letters. The Mailing Labels example will be discussed briefly later on.
A window will pop up asking you to choose a document . Select Active Window if you want to add mail merge data to the current document displayed in Word; otherwise choose New Main Document, which loads a new blank Word file.
You should now notice that a new button, Edit, has appeared on the Mail Merge Helper window. This is the button you will click to edit the actual document ...but before you do that&
STEP 2 -choose the data (the Excel file)
The first two choices are the only ones you should concern yourself with.
Create Data Source brings up a window that lets you create a substitute for an Excel sheet. It's fairly basic and has limitations.
Open Data Source presents a dialog window to allow you to choose the file holding the data. Since we want to find our Excel file, be sure to first set the Files of Type drop-down field to MS Excel Worksheets. Then navigate to find the Excel file where you saved your data sheet.
NOW EDIT THE DOCUMENT
Before we proceed to Step 3, we must first create our Form Letter (or Mailing Label); so at this point we leave the Mail Merge Helper. After choosing the data source, the Mail Merge Helper should have closed and left you in the document window. If not, simply click the Create button from Step 1.
|
|
|
|
|
|
|
|
|
|
|
|
|
|
|
|
|
|
|
|
|
|
|
 |
|
|
|
|
|
Once you've set a document for Mail Merge, you will notice that an additional toolbar has been added to you Microsoft Word window.
|
|
|
|
|
|
|
|
 |
|
|
|
|
|
|
|
|
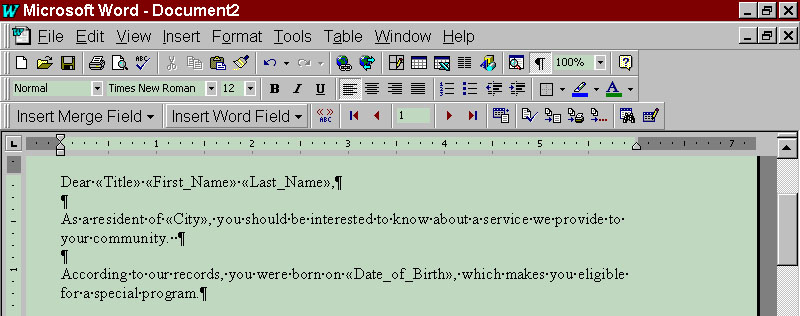
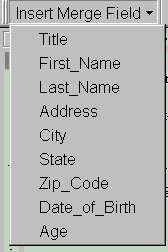
You now type your letter (or edit an existing one) and use the Insert Merge Field button to place data from your Excel file.
|
|
|
|
|
|
|
|
 |
|
|
|
|
|
|
|
|
|
The list under the Insert Merge Field menu should look familiar to you - it is the column headings to your Excel worksheet. Now as you type the letter and insert your data fields, your letter should look something like the sample above.
|
|
|
|
|
|
|
|
|
|
|
|
|
|
|
|
|
MAILING LABELS
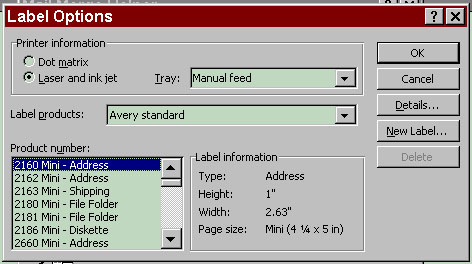
Before we actually execute a Mail Merge (which is Step 3), let's digress for a moment and discuss how to do mailing labels. Back at Step 1, if we had selected Mailing Labels under the Create button, you would see the Label Options window at the right. Here you get to pick from a library of standard label sizes or create a new definition.
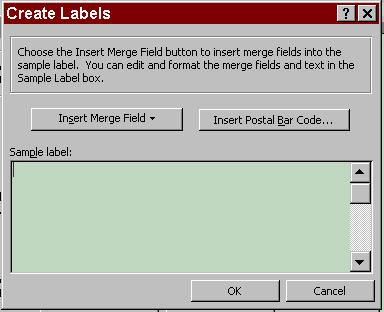
Once you click the OK button, a special Create Labels window (shown at the right) appears to allow you to insert the fields from your Excel spreadsheet. Use the Insert merge field button to select from your data fields and press the Enter key, on the keyboard, when you want to start a new line.
|
|
|
|
|
|
|
 |
|
|
|
|
 |
|
|
|
|
|
|
|
|
|
STEP 1 -executing a merge
We've built our Form Letter, or defined our Mailing Label -- now we want to generate the finished product.
ToolsÆMail Merge from the menu to bring up the Mail Merge Helper window.
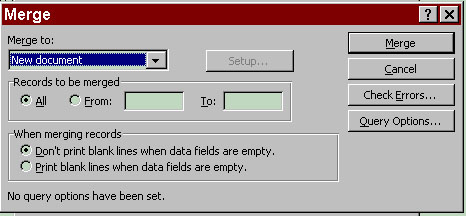
Click the Merge button, and the Merge window at the right appears. In the Merge to drop-down field, it is best to select New document - so you can preview the results (and make special changes to certain entries).
Click the OK button and stand back...a new document, with as many pages as there are entries in your Excel file, is created. If you have a large Excel file, this would be a great time to go get a cup of coffee!
|
|
|
|
|
|
|
|
|
|
|
|
 |
|
|
|
|
|
|
|
|
|
|
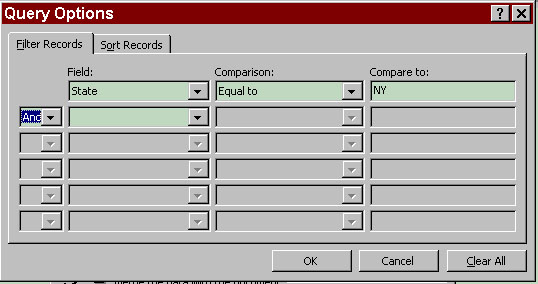
In many cases, you may not want to include every entry from your Excel file in the finished merged document. That's where the Query Options button comes in. The screen it displays is shown at the left. Use it to build conditions on which to filter your data source. Choose the field you want to filter from the first column; then the logical comparison test in the second; and finally, type the data to apply that test to in the third column. You can even change the sort order of the resulting forms or labels produced by the merge - just click on the Sort Records tab and select how your list is to be sorted.
|
|
|
|
|
|
|
 |
|
|
|
|
|